Driveline Lubrication
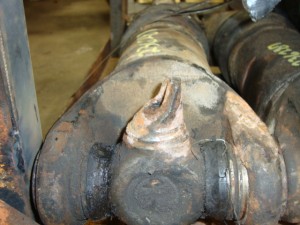
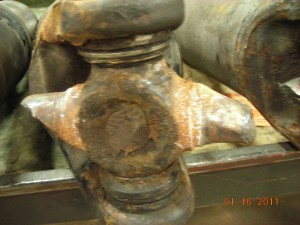
U-joint cross, broken through lube fitting hole
This failure is usually caused by someone who does not install the U-joint in the correct orientation in the drive shaft. The front U-joint of a drive shaft MUST be installed so the driving torque compresses the U-joint lube fitting.
Here’s what we mean:
- When you look at any application from the drive end, the drive shaft turns clock-wise when torque is applied.
- In a vehicle, the “driving yoke” is the yoke on the transmission and the “driven yoke” is the yoke on the drive shaft.
- In an industrial application, the driving yoke is the yoke attached to the power supply.
- If the U-joint is correctly installed, torque will compress the lube fitting.
How to check the orientation of the lube fitting in an application:
- Look at the drive shaft from the front. Rotate it so the ears of the yoke on the driving member are vertical, (“North” and “South”). The yoke on the drive shaft will be horizontal, (“East” and “West”).
- If the U-joint is correctly installed, the lube fitting will be at a 45 degree angle to the right. (“Northeast”).
Here’s another way to check lube fitting orientation on your drive shaft:
- Lay it on the table with the yokes of the slip yoke horizontal. (“East” and “West”).
- Look into the slip yoke and at the position of the zerk fitting. It should be inboard on the yoke (towards the tube) and pointing “Northeast”.
Lube related failures cause the vast majority of drive shaft related failures.
The most common lube related failure usually occurs in the U-joint kit area.
The second most common failure usually occurs in the “slip” area of the drive shaft.
Lack of lubrication or neglecting to follow recommended lube procedures is the #1 cause of drive shaft failures.
A lube related failure might include:
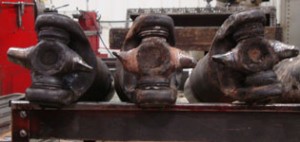
- A U-joint with a completely “burned off” journal.
- A U-joint with needle marks in the bearing surface. (Called brinelling) (Needle marks that can be felt with a thumbnail).
- A U-joint with “scrape” marks, (called spalling) on the bearing surface.
Spalling occurs when dirt or moisture enters the bearing area of the U-joint and is not “flushed out” during normal service because:
- The service mechanic did not follow service interval recommendations or…
- Did not take care to “purge” all four seals of the U-joint.
A U-joint having one or more “blackened” bearing surfaces.
- A U-joint bearing surface can “burn” if it is operated at a high U-joint angle (more on U-joint angles later) or if it is installed in a drive shaft yoke or end fitting yoke that has ears that are not in correct alignment.
- A key indicator of a defective yoke is a U-joint that has two burned bearing surfaces, 180 degrees from one another.
A lube related failure might be caused by:
Using the incorrect lube.
- Manufacturers recommend using a lube meeting the NLGI Grade 2 spec, with an EP additive.
- It should have a temperature range of +325 degrees F to a low of –10 degrees F.
If you are in doubt of the correct grease to use, some of our U-joint suppliers use Chevron Ultra Duty EP2 grease in their production drive shafts.
Lubricating at incorrect intervals.
U-joints should always be serviced at the manufacturers recommended intervals:
- Service intervals may vary from 3 months for regular, over-the-road type vehicles that carry normal highway approved loads, to 500 hours for normal industrial applications, to 200 hours for an industrial application that runs constantly, in severe environmental conditions, or at high loads, or both.
- All manufacturers provide recommendations regarding service intervals for their products.
Not following the correct procedure when you lube a U-joint.
We recommend forcing grease into each U-joint until you see new grease at each of the four U-joint bearing seals. Use care to make sure you see ONLY new grease at each seal. This “purging effort” will guarantee that you have forced any contaminates and moisture out of the U-joint.
If something happens and you cannot purge all four seals, you may be forced to remove a U-joint to inspect it. Make sure you follow manufacturer recommendations on U-joint installation, when you re-install it, because some manufacturers use self locking bolts to retain their U-joints and these bolts may not be re-usable.
Not following the correct procedure when you lube a U-joint.
Most drive shafts have some sort of slip assembly built into them so they can change length if necessary. Most slip assemblies consist of a slip yoke (with U-joint in it) and a splined shaft that is usually welded to the drive shaft tube.
- Manufacturers recommend forcing grease into the slip assembly through the lube fitting until it comes out of the vent hole in the slip yoke plug.
- Then they recommend covering the vent hole with your finger while you force additional grease into the slip assembly until it comes out of the seal on the end of the slip yoke.
- Visible grease at the slip yoke seal insures grease has passed over the slip surfaces inside the assembly.
Improper installation and application techniques come in a close second as the cause of drive shaft failures. An improperly installed drive shaft can generate system-destroying vibrations that can result in catastrophic failures.


